Organization Master அமைத்தல்
நோயாளிகளுக்காகப் பணம் செலுத்தும் insurance நிறுவனங்கள், TPAs, corporates மற்றும் அரசு திட்டங்களை, அவற்றின் agreement, credit terms மற்றும் rate planடுடன் சேர்க்கவும்.
இதைச் செய்பவர்: மருத்துவமனை நிர்வாகி அல்லது பில்லிங் மேலாளர் எங்கே: Billing › Masters › Organization Master இதற்கு முன் அமைக்க வேண்டியவை: Rate Tariffs
ஒரு organisation என்பது ஒரு நோயாளியின் billஐ யார் செலுத்துகிறார்களோ அவர்கள்: நோயாளி (Self), ஒரு insurance நிறுவனம், ஒரு TPA, ஒரு corporate அல்லது ஒரு அரசு நிதி. ஒரு நோயாளி ஒரு organisationஇன் கீழ் பதிவு செய்யப்படும்போது அல்லது அனுமதிக்கப்படும்போது, அவர்களது bills அந்த organisationஇன் rate plan மற்றும் credit termsஐப் பயன்படுத்தும்.
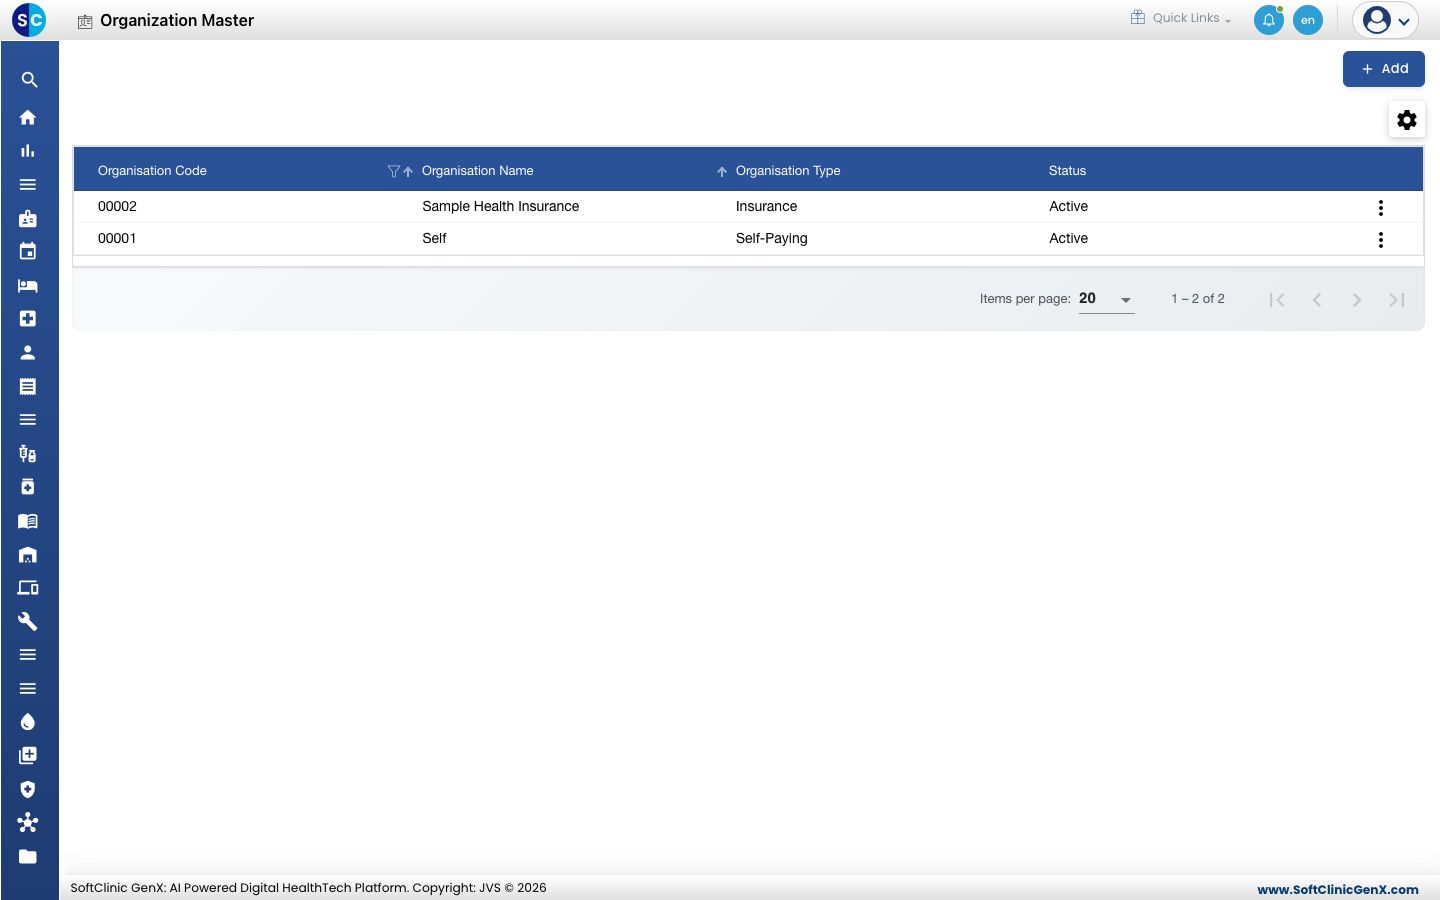
ஒரு organisationஐச் சேர்த்தல்
-
Billing › Masters › Organization Master க்குச் செல்லவும்.
-
Add ஐ கிளிக் செய்யவும். Contract Organization Definition பக்கம் திறக்கும்.
-
மேல் பகுதியை நிரப்பவும்:
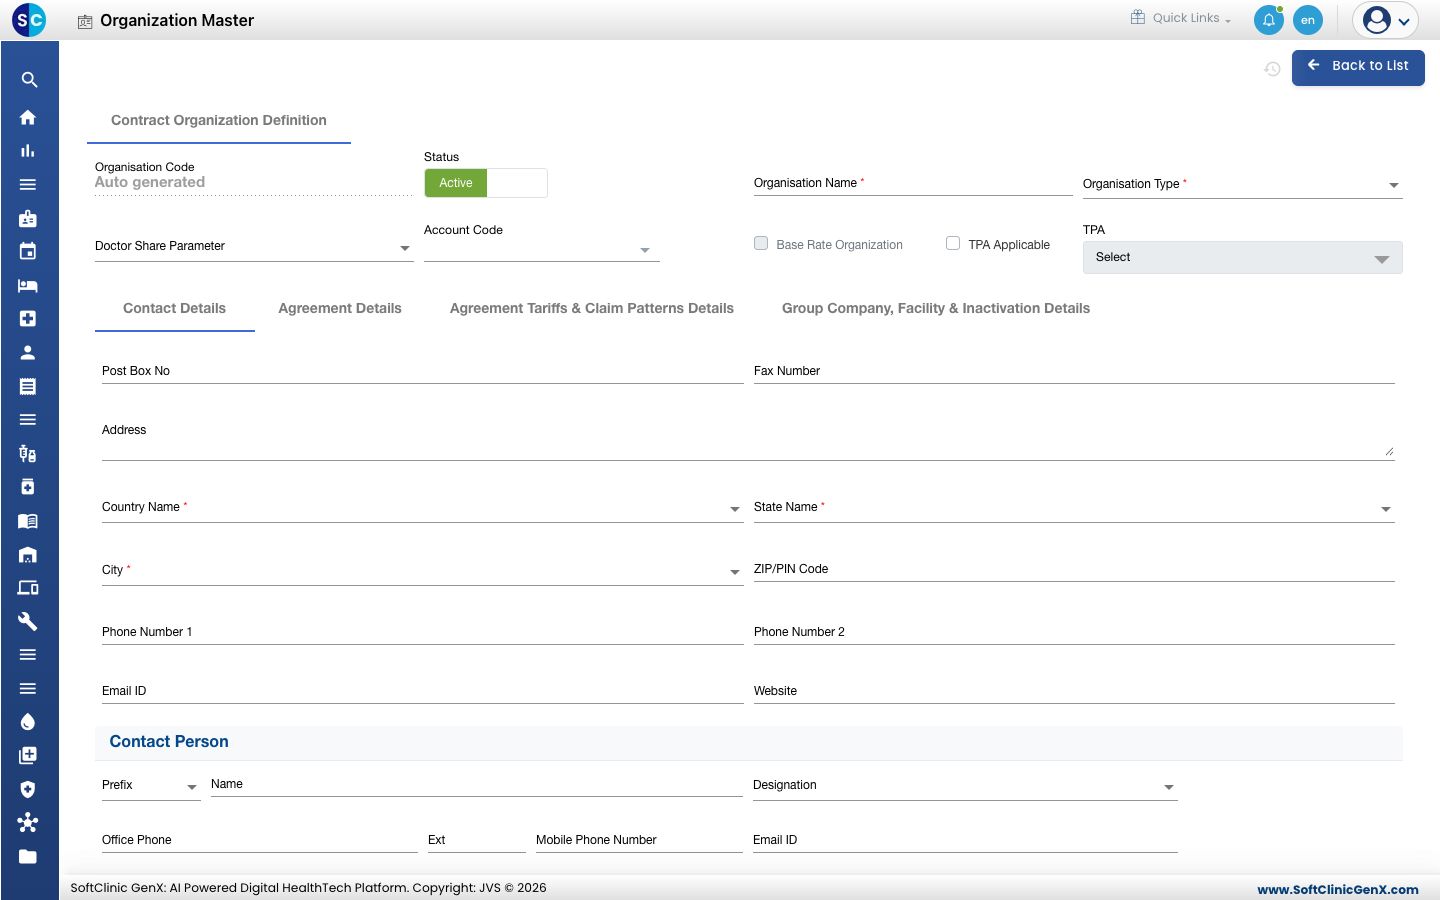
புலம் என்ன உள்ளிட வேண்டும் அவசியமா Organisation Code நீங்கள் சேமிக்கும்போது தானாக நிரப்பப்படும். — Status Active ஆக விடவும். — Organisation Name payerஇன் பெயர். ஆம் Organisation Type Insurance, TPA, Organisation, Govt./CM/PM Funds அல்லது Self-Paying. ஆம் Doctor Share Parameter இந்த payerஇன் நோயாளிகளுக்கு doctor shares எப்படி கணக்கிடப்படுகின்றன. இல்லை Account Code இந்த payerக்கான accounting ledger. இல்லை Base Rate Organization மருத்துவமனையின் base ratesஆக இருக்கும் விலைகள் உள்ள organisationக்கு டிக் செய்யவும். ஒன்று மட்டுமே அனுமதிக்கப்படும், எனவே மற்றொரு organisationக்கு அது இருந்துவிட்டால் box grey ஆக இருக்கும். இல்லை TPA Applicable, TPA claims ஒரு TPA வழியாக சென்றால் டிக் செய்து, பின் TPA ஐத் தேர்ந்தெடுக்கவும். இல்லை -
Contact Details டேபில், முகவரி மற்றும் தொலைபேசி எண்களை உள்ளிடவும். Country Name, State Name மற்றும் City அவசியம். Contact Person இன் கீழ் ஒன்று அல்லது அதற்கு மேற்பட்ட நபர்களைச் சேர்க்கவும்.
-
Agreement Details டேபைத் திறந்து contractஐ உள்ளிடவும்:
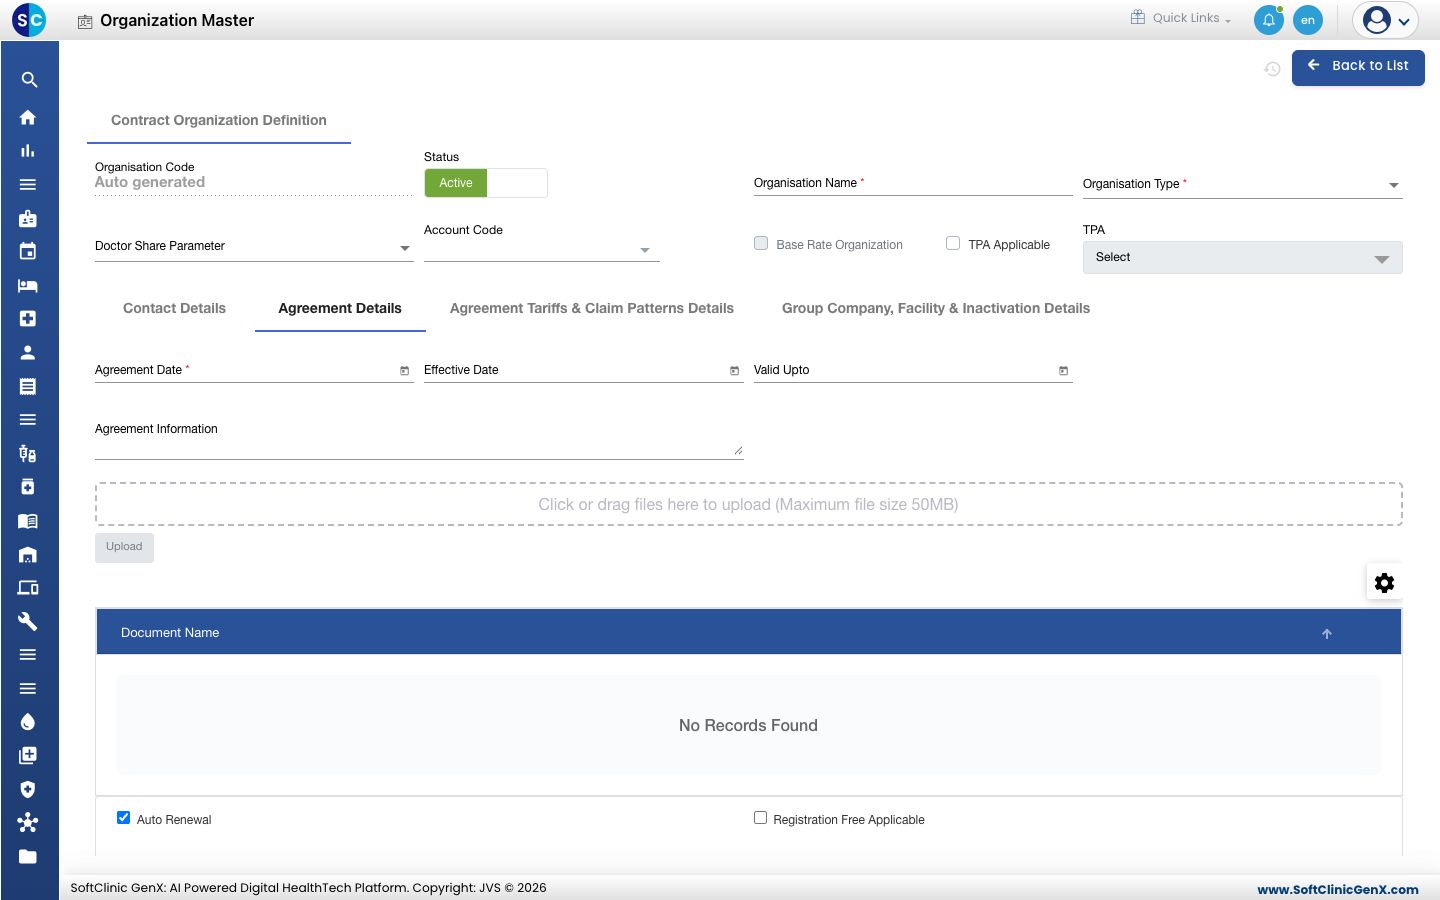
- Agreement Date (அவசியம்), Effective Date மற்றும் Valid Upto.
- Agreement Information இன் கீழ் கையொப்பமிடப்பட்ட agreementஐ upload செய்யவும்.
- Credit terms: Credit Limit, Credit Days, Total Advance Amount, Total Outstanding Amount மற்றும் Currency.
- payer ஒரு insurer எனில், Insurance terms: Default Co-pay %, Default Deductible Amount மற்றும் Validity days for pre-authorization/approval.
- claims ஐ ஒப்புதலிடும் நபர்கள், Authorization Details இன் கீழ்.
-
Agreement Tariffs & Claim Patterns Details டேபைத் திறந்து இந்த payer எப்படி விலை நிர்ணயிக்கப்பட்டு claim செய்யப்படுகிறது என்பதைத் தேர்ந்தெடுக்கவும்:
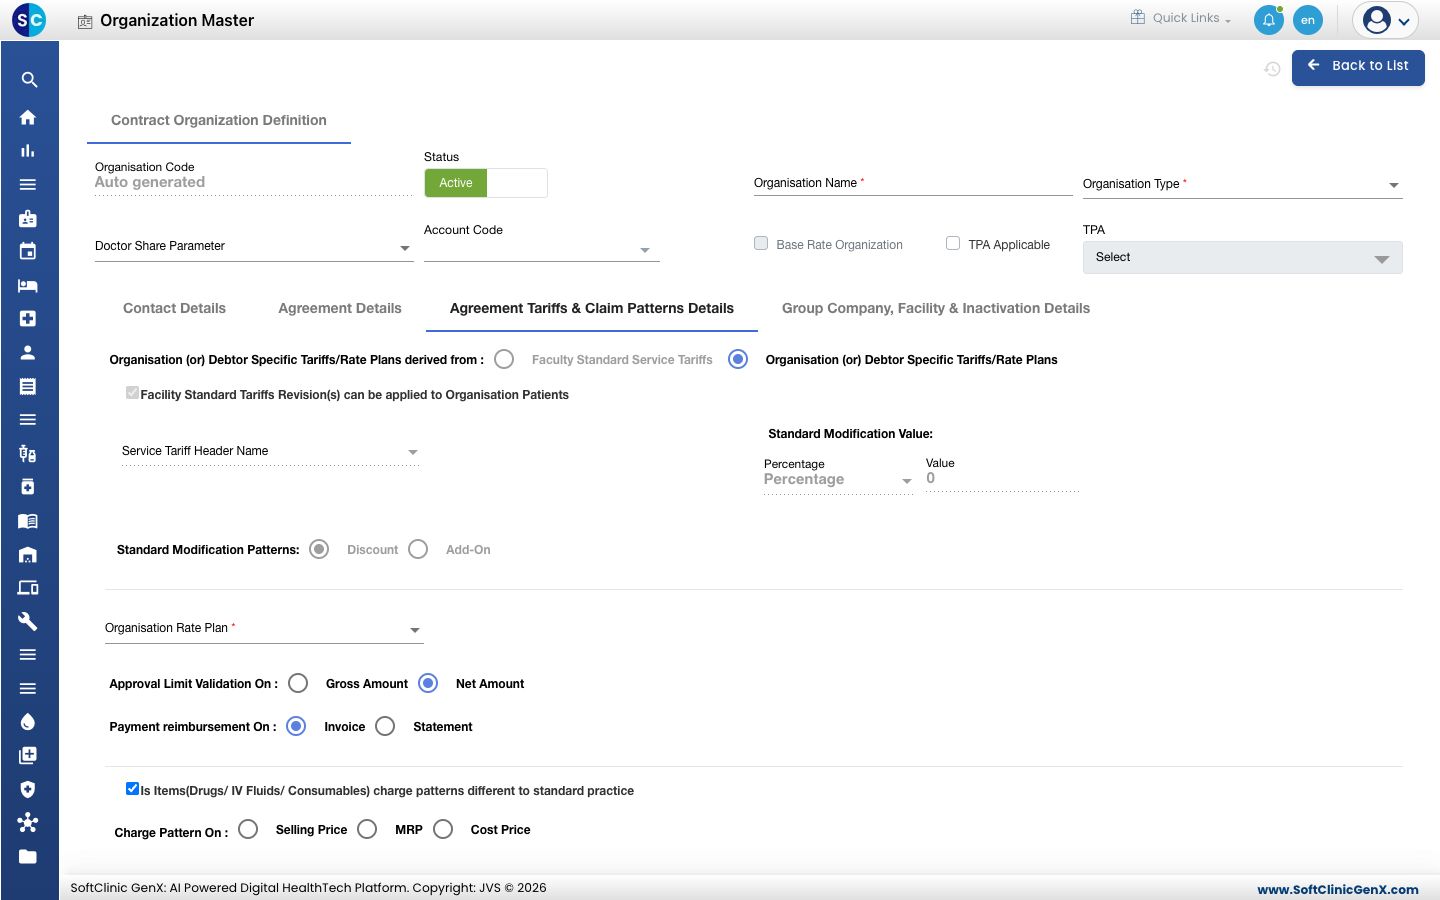
- Organisation Rate Plan (அவசியம்): இந்த payerஇன் நோயாளிகள் எந்த rate planலிருந்து பில் செய்யப்படுகிறார்கள்.
- Standard Modification Patterns மற்றும் Standard Modification Value: tariffன் மீது ஒரு discount அல்லது add-on, percentage அல்லது valueஆக.
- Approval Limit Validation On (Gross Amount அல்லது Net Amount) மற்றும் Payment reimbursement On (Invoice அல்லது Statement).
- Charge Pattern On: drugs மற்றும் consumables வழக்கமான முறைக்குப் பதிலாக Selling Price, MRP அல்லது Cost Price இல் வசூலிக்கப்பட்டால், அதற்கு மேலுள்ள boxஐ டிக் செய்யவும்.
- Applicable Visit Types, Pre-authorization Submission Format மற்றும் Claim Submission Format.
-
தேவைப்பட்டால் Group Company, Facility & Inactivation Details டேபைத் திறக்கவும்:
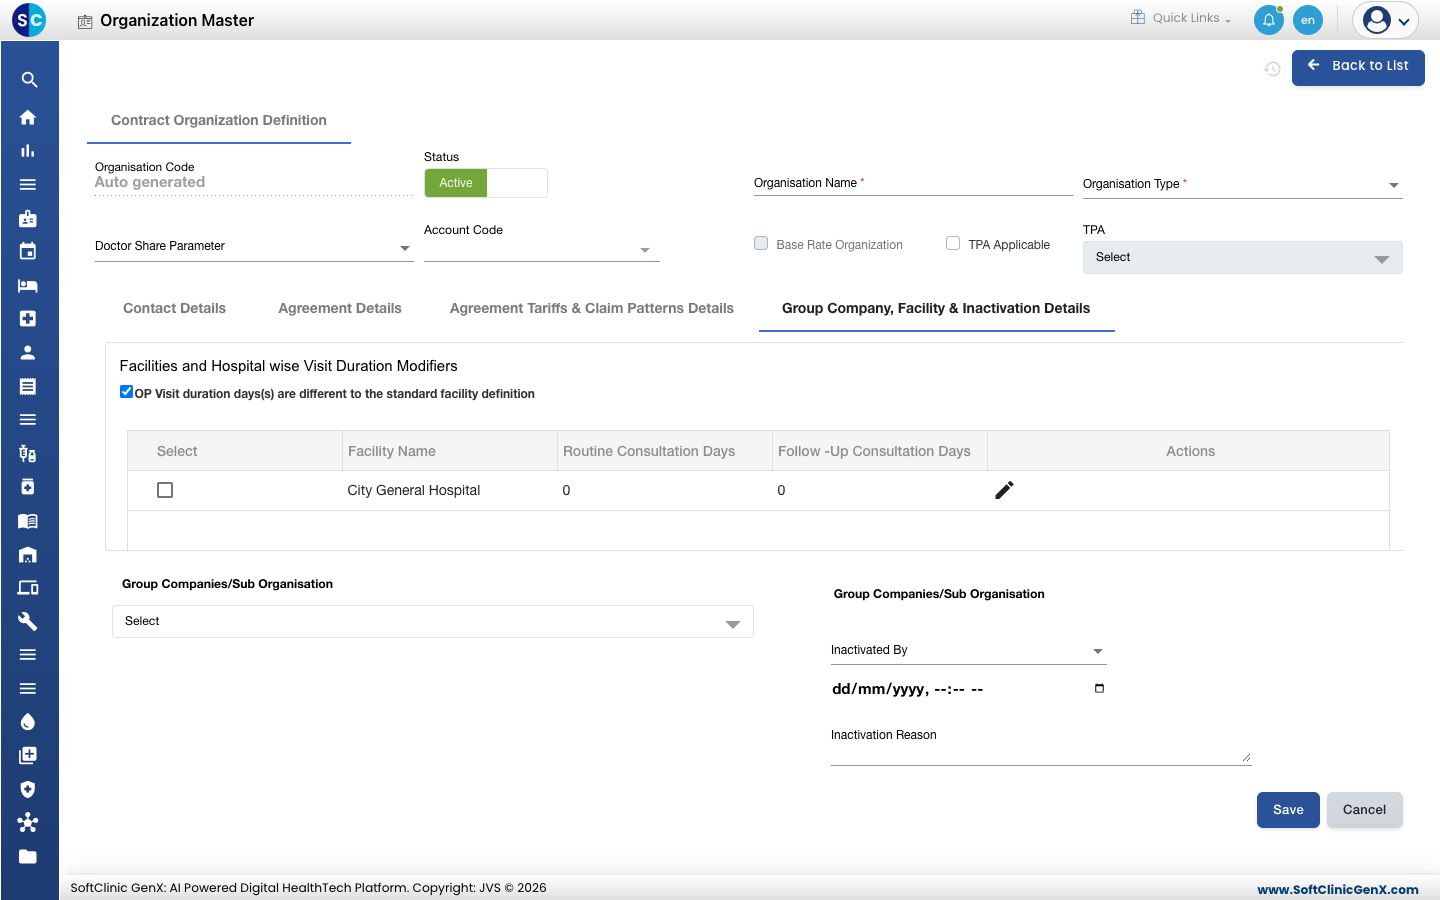
- ஒரு facilityயில் இந்த payerக்கான வெவ்வேறு Routine Consultation Days மற்றும் Follow -Up Consultation Days ஐ அமைக்கவும்.
- Group Companies/Sub Organisation ஐ இணைக்கவும்.
-
Save ஐ கிளிக் செய்யவும். organisation பட்டியலில் தோன்றும்.
ஒரு organisationஐ மாற்றுதல் அல்லது செயலிழக்கச் செய்தல்
- பட்டியலில், வரிசையின் முடிவில் உள்ள ⋮ பொத்தானைக் கிளிக் செய்து Edit ஐத் தேர்ந்தெடுக்கவும். எதையும் மாற்றாமல் பார்க்க View ஐத் தேர்ந்தெடுக்கவும்.
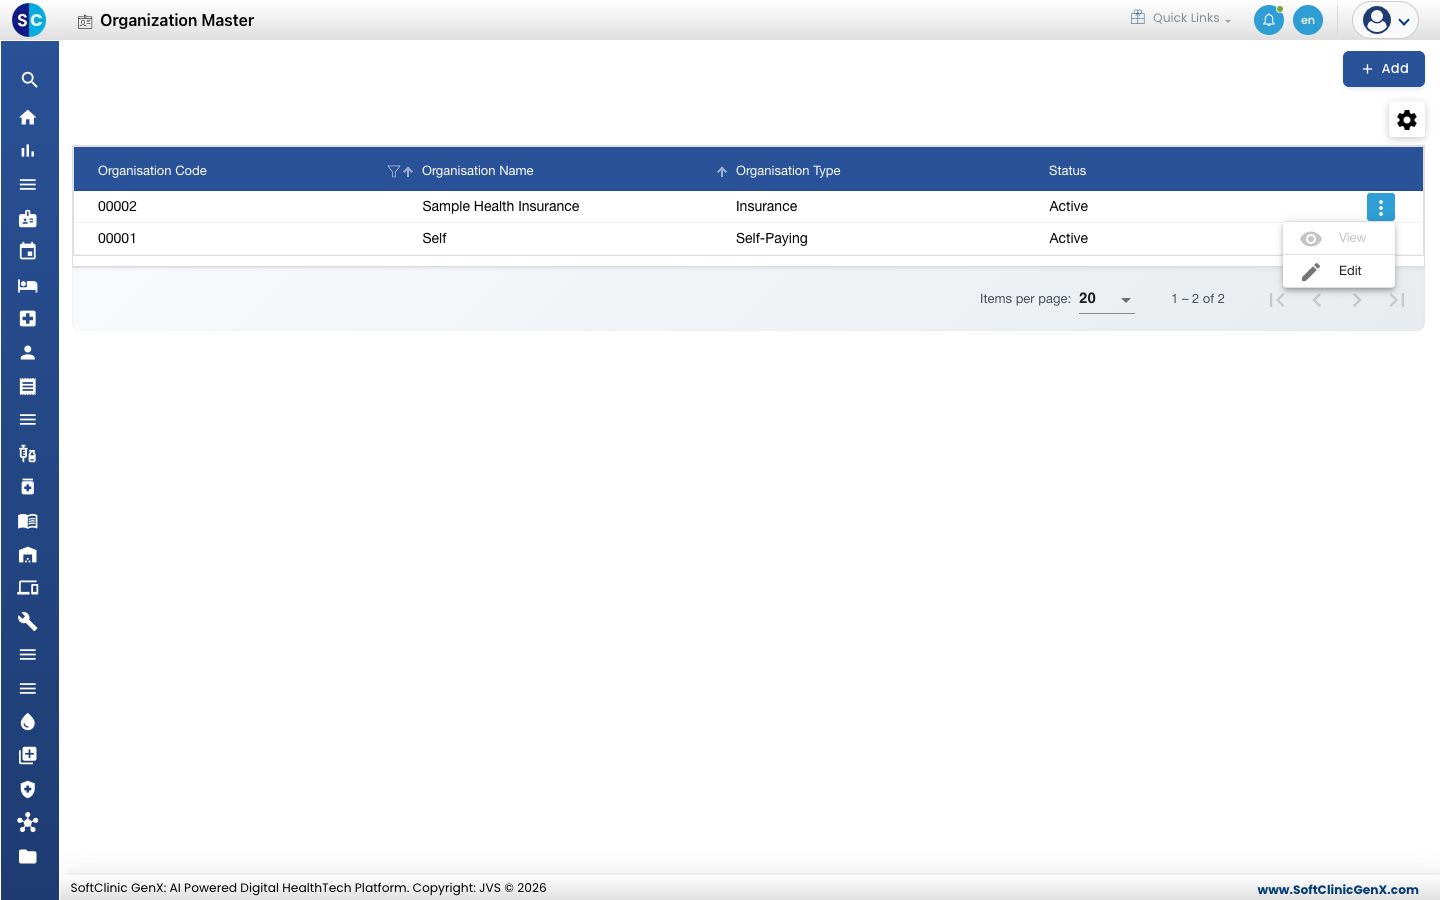
- உங்களுக்குத் தேவையான புலங்களை மாற்றவும்.
- organisationஐப் பயன்படுத்துவதை நிறுத்த, Status ஐ Inactive ஆக மாற்றவும். பின் Group Company, Facility & Inactivation Details டேபில் Inactivated By, தேதி மற்றும் நேரம், மற்றும் Inactivation Reason ஐ நிரப்பவும். status inactive ஆக இருக்கும்போது மூன்றும் அவசியம்.
- Save ஐ கிளிக் செய்யவும்.
தெரிந்து கொள்ள வேண்டியவை
- முதலில் Rate Tariffs இல் rate planஐ உருவாக்கவும். Organisation Rate Plan ஏற்கனவே உள்ள plans ஐ மட்டுமே பட்டியலிடும்.
- Fax Number, ZIP/PIN Code மற்றும் தொலைபேசி புலங்கள் எண்களை மட்டுமே ஏற்கும்.
- Self organisation தங்கள் bills ஐத் தாங்களே செலுத்தும் நோயாளிகளுக்கானது.
- சேமிக்காமல் வெளியேற Cancel அல்லது Back to List ஐ கிளிக் செய்யவும்.
தொடர்புடையவை
- அடுத்தது: Discount Master அமைத்தல்
- முந்தையது: Rate Tariffs அமைத்தல்
- Billing FAQs