Set up Investigation Masters
Who does this: laboratory administrator Where: Laboratory › Laboratory Masters › Investigation Masters Set up before: Section Master, Service, Specimen, Container Type and Result Type Values
Investigation Masters holds every laboratory test the hospital performs. For each test you record the sample it needs, how its result is entered, its normal (reference) ranges and any values that are calculated by formula. There are two kinds of entry:
- An investigation is a test that can be ordered, such as Fasting Blood Sugar or HbA1c Profile.
- A parameter is one result line inside a test, such as HbA1c or Estimated average glucose (eAG). A test with several result lines is built from parameters.
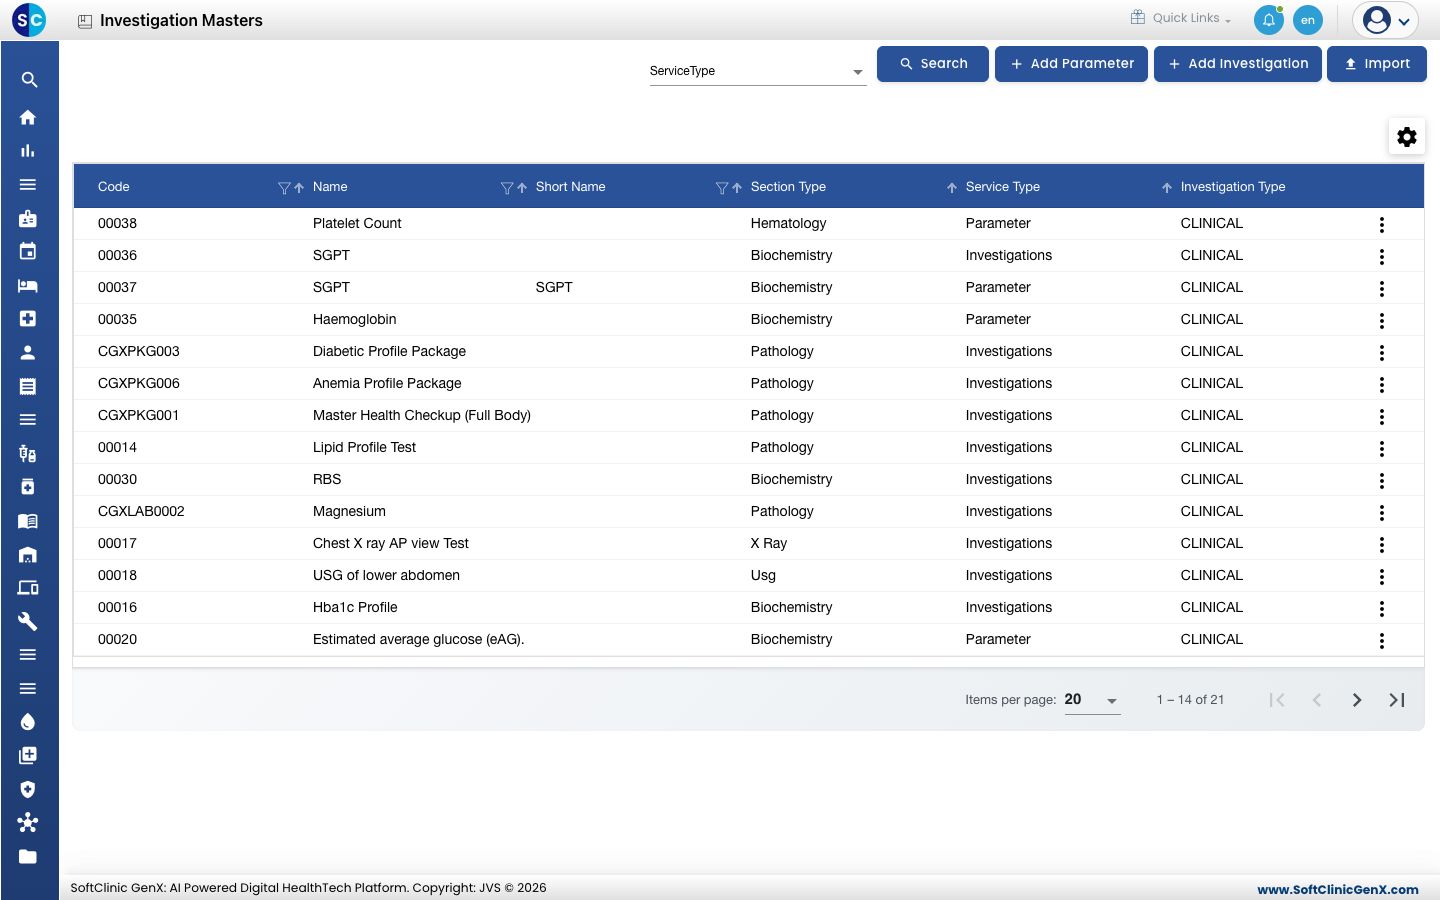
Use the ServiceType filter and Search to narrow the list.
Add an investigation
-
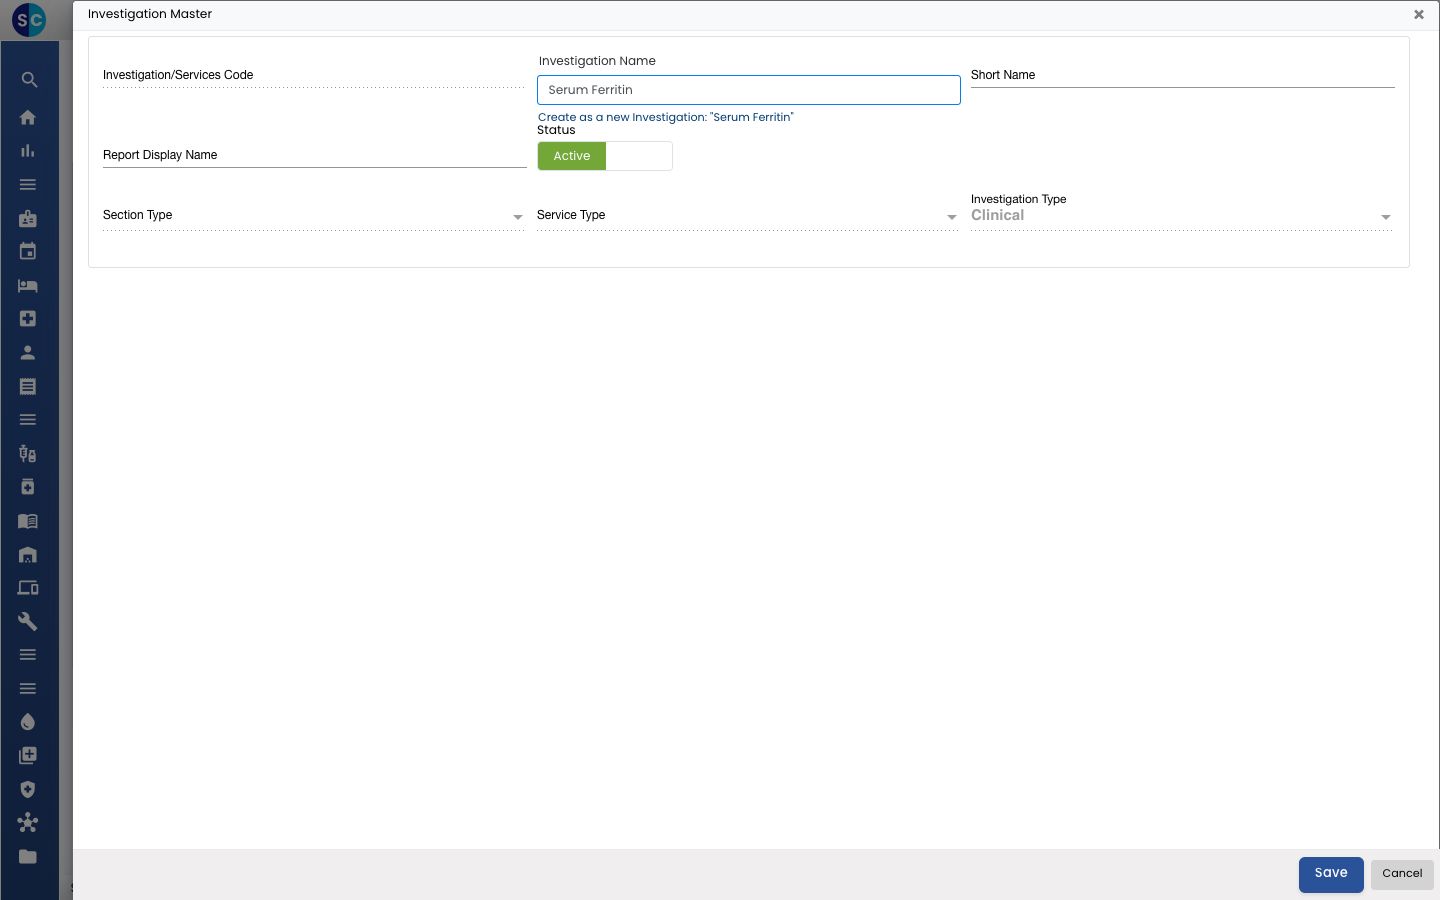
Go to Laboratory › Laboratory Masters › Investigation Masters and click Add Investigation. The Investigation Master form opens.
-
In Investigation Name, type the test name. The list shows matching services from the service master.
- Pick the service if it is listed.
- If the name is new, click Create as a new Investigation.
- If the form says the test is Already added to Investigation Master, open the existing test instead of creating a second one.
-
Fill in the header fields:
Field What to enter Required Investigation/Services Code Filled in by the system. — Investigation Name The test name, picked or created as above. Yes Short Name A short name for lists and labels. No Report Display Name The name printed on the report, if it differs from the test name. No Section Type The laboratory section, such as Biochemistry or Hematology. No Service Type Investigations for a test. Yes Investigation Type Leave on Clinical for a laboratory test. Yes -
Fill in the tabs below the header, as described in the next sections, then click Save.
Investigation's More Info.
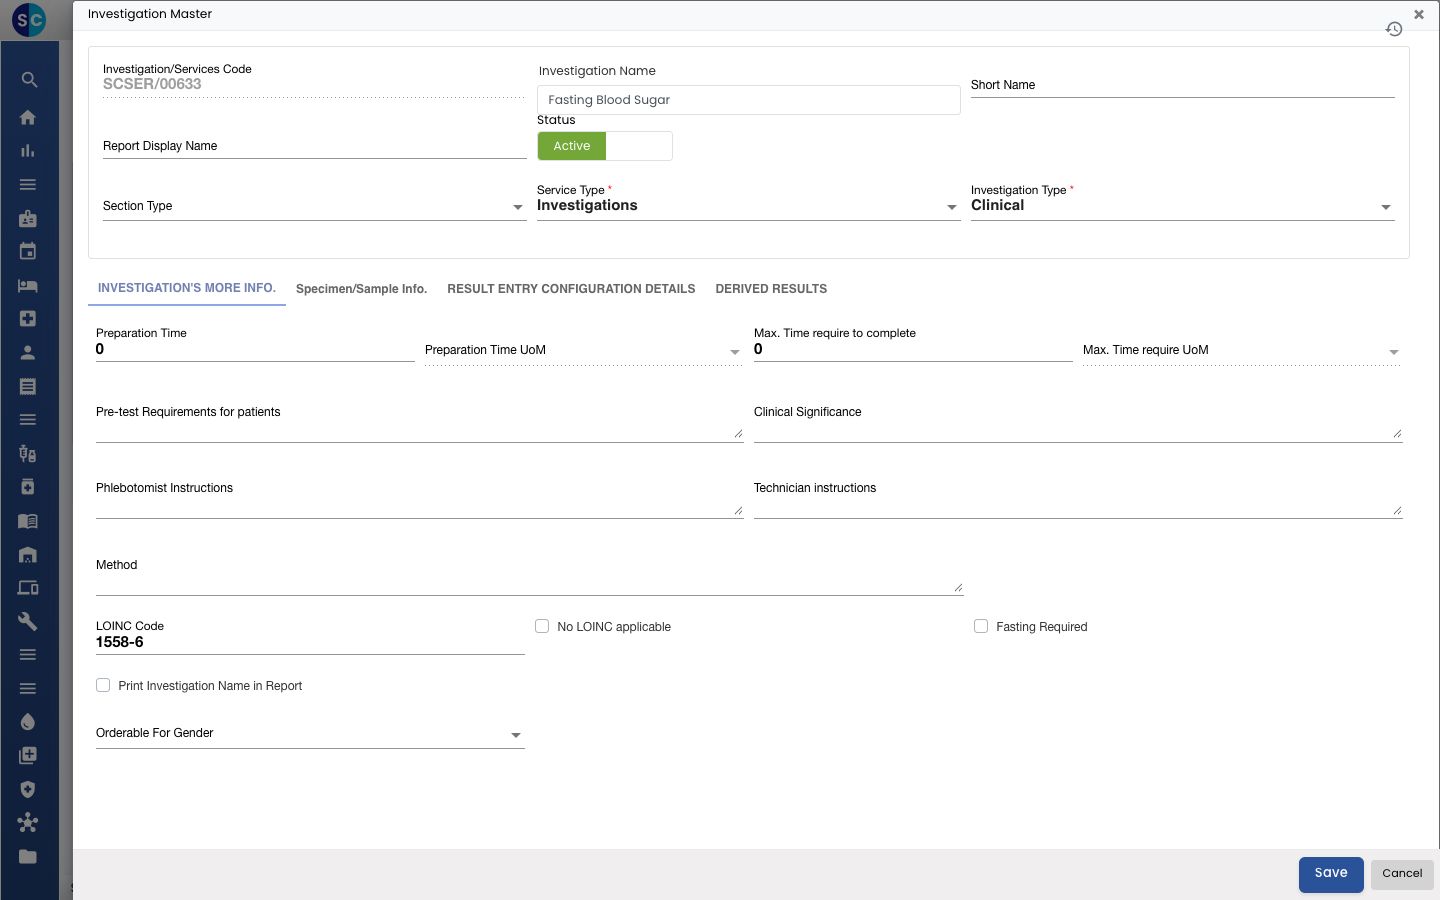
Record the details that staff and patients need:
| Field | What to enter | Required |
|---|---|---|
| Preparation Time, Max. Time require to complete | How long preparation and the test take, with the unit in the UoM field next to it. | No |
| Pre-test Requirements for patients, Clinical Significance, Phlebotomist Instructions, Technician instructions, Method | Free text, up to 1000 characters each. | No |
| LOINC Code | The international LOINC code for the test, for example 1558-6. | Yes, for a new test, unless No LOINC applicable is ticked |
| No LOINC applicable, Reason for no LOINC | Tick if the test has no LOINC code, and give the reason. | Reason is required when ticked |
| Fasting Required | Tick if the patient must fast. | No |
| Print Investigation Name in Report | Tick to print the test name on the report. | No |
| Orderable For Gender, Orderable Age From / To | Limit who the test can be ordered for. | No |
| Description | Notes or interpretation text for the test. | No |
Specimen/Sample Info.
Add the sample the test needs. Click Add on the tab; a small form opens.
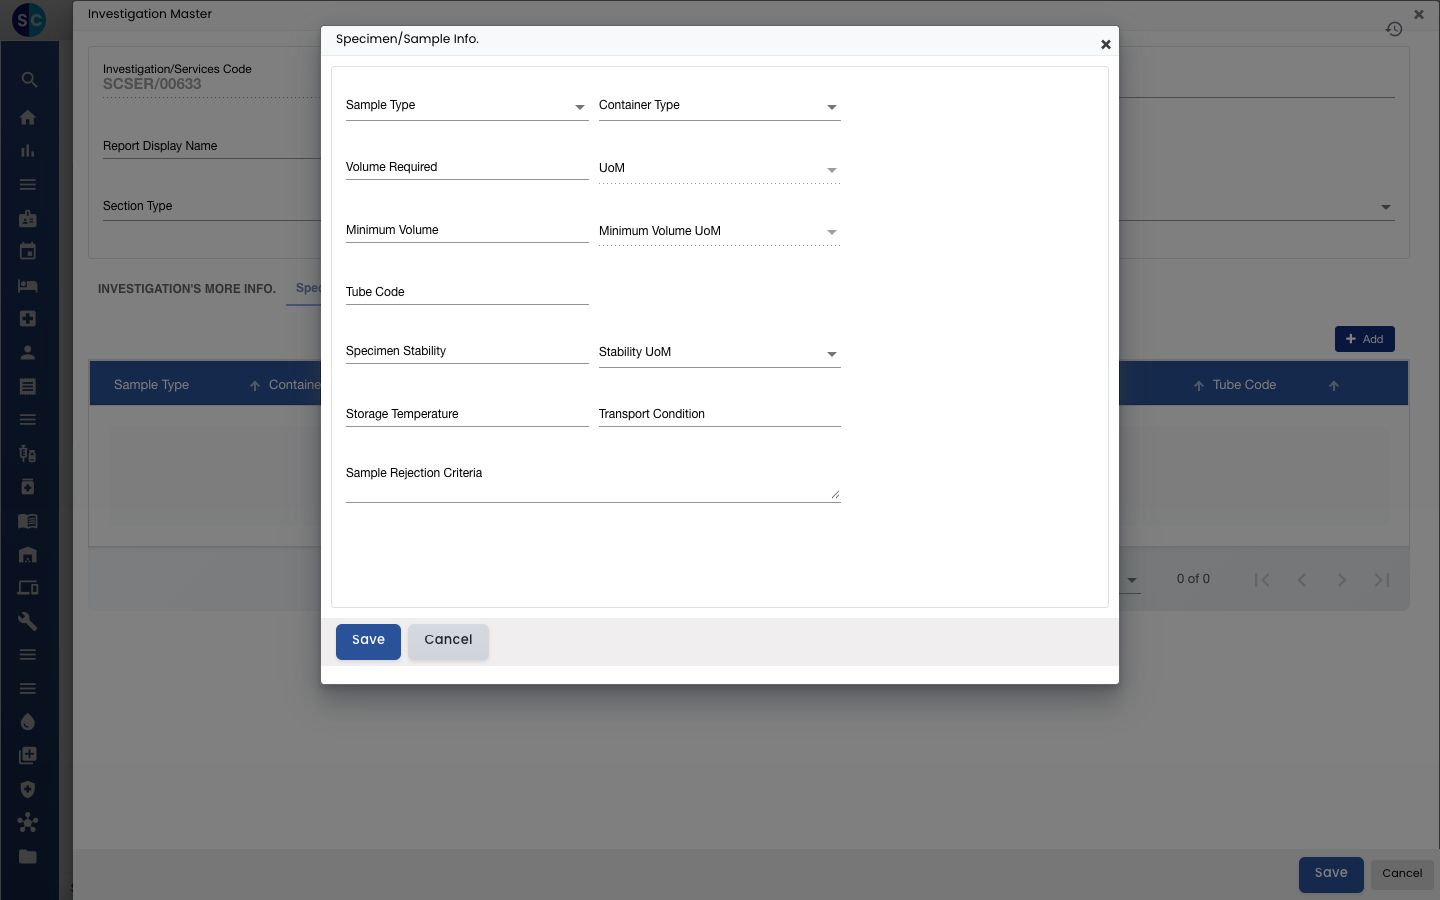
| Field | What to enter | Required |
|---|---|---|
| Sample Type | The specimen, from the Specimen master. | Yes, for a new laboratory test |
| Container Type | The tube or bottle, from the Container Type master. | No |
| Volume Required, Minimum Volume | The volume to collect, each with its UoM. | No; the UoM is required once a volume is entered |
| Tube Code | A short code for the tube, up to 4 characters. | No |
| Specimen Stability, Storage Temperature, Transport Condition | How long and how the sample can be kept and moved. | No |
| Sample Rejection Criteria | When the laboratory should reject the sample. | No |
Click Save in the small form. The sample appears in the tab's list, where you can edit or remove it.
Result Entry Configuration Details
This tab decides how results are entered for the test. Choose the Result Entry Mode:
- Direct Entry — the test has one result. Choose the Result Type and UoM.
- Parameter Entry — the test has several result lines, each a parameter (see Add a parameter).
Result Type can be Numeric, Text, Coded Element, Template, Canned File, Text File or Display. For Coded Element, you pick the allowed answers from Result Type Values and can mark one as the default.
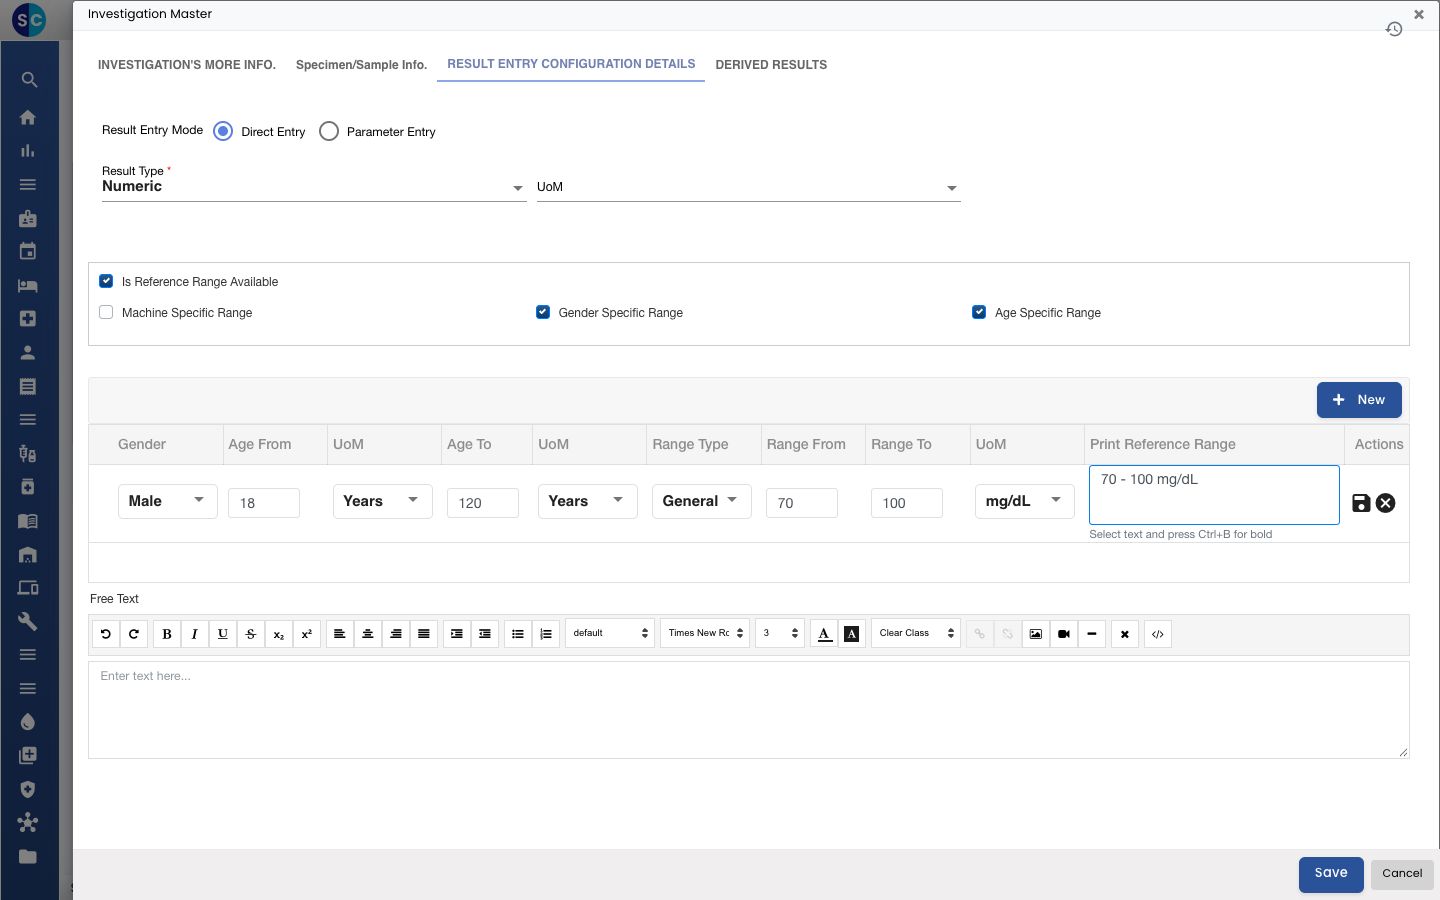
Reference ranges (Numeric results). Tick Is Reference Range Available. Tick Gender Specific Range, Age Specific Range or Machine Specific Range if the normal range differs by gender, age or analyser. Then click New to add a row for each range:
| Column | What to enter |
|---|---|
| Gender | Male, Female or Transgender (when the range is gender specific). |
| Age From, Age To, UoM | The age band, in Days, Months or Years (when the range is age specific). |
| Range Type | General for the normal range, Border Line or Panic for other limits. |
| Range From, Range To, UoM | The low and high values and their unit. Range From must be less than Range To. |
| Print Reference Range | The range text exactly as it should print on the report, for example 70 - 100 mg/dL. |
Click the save icon at the end of the row to keep it. Add one row for each gender, age band and range type you need.
Parameter Entry. Click New and pick each parameter in Parameter Name. The result type and unit come from the parameter; Seq. No shows the order of the lines, and Print decides whether the line is printed. Click Normal Range & Result Configuration to see a parameter's ranges.
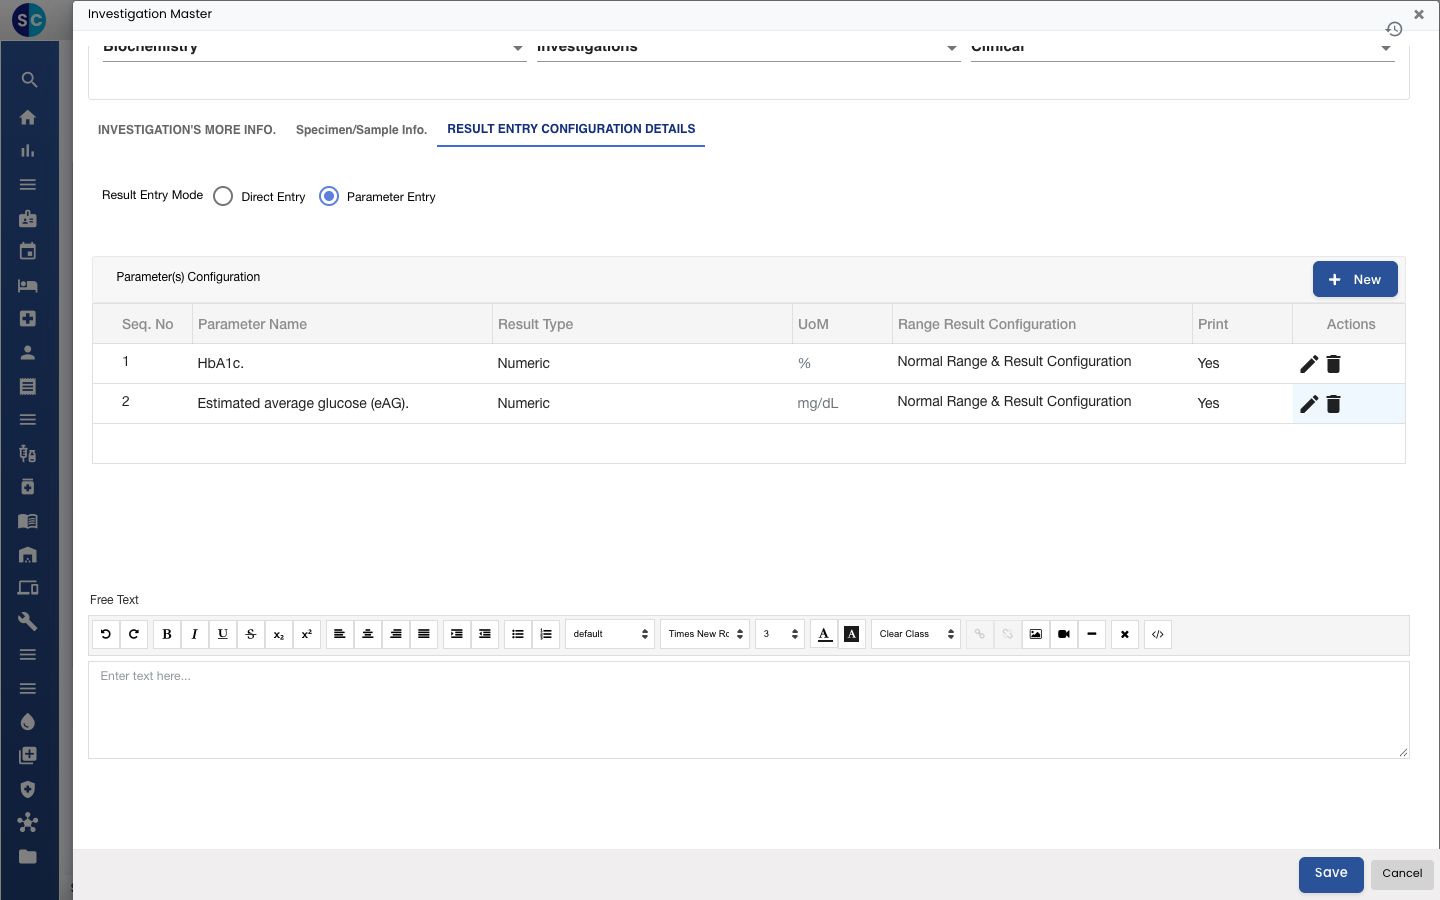
The Free Text box at the bottom holds any text to show with the result.
Add a parameter
- On the Investigation Masters list, click Add Parameter. The Parameter Master panel opens on the right.
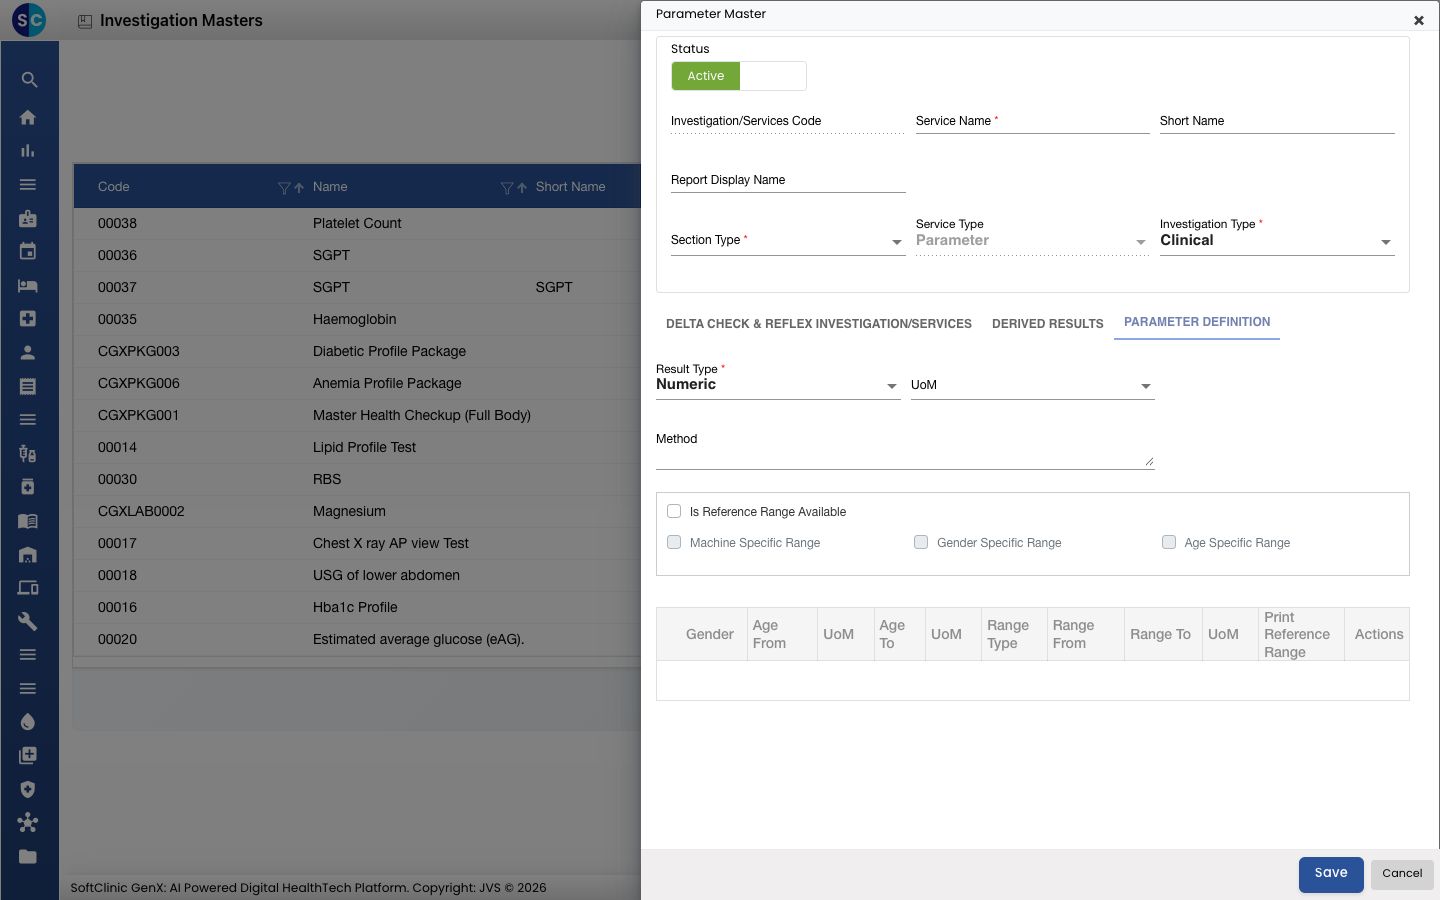
- Enter the Service Name and choose the Section Type. Service Type is fixed to Parameter, and Investigation Type stays on Clinical.
- On the PARAMETER DEFINITION tab, choose the Result Type and UoM, enter the Method if needed, and add reference ranges exactly as for a test (see above).
- Click Save. You can now add the parameter to a test with Parameter Entry.
Delta check
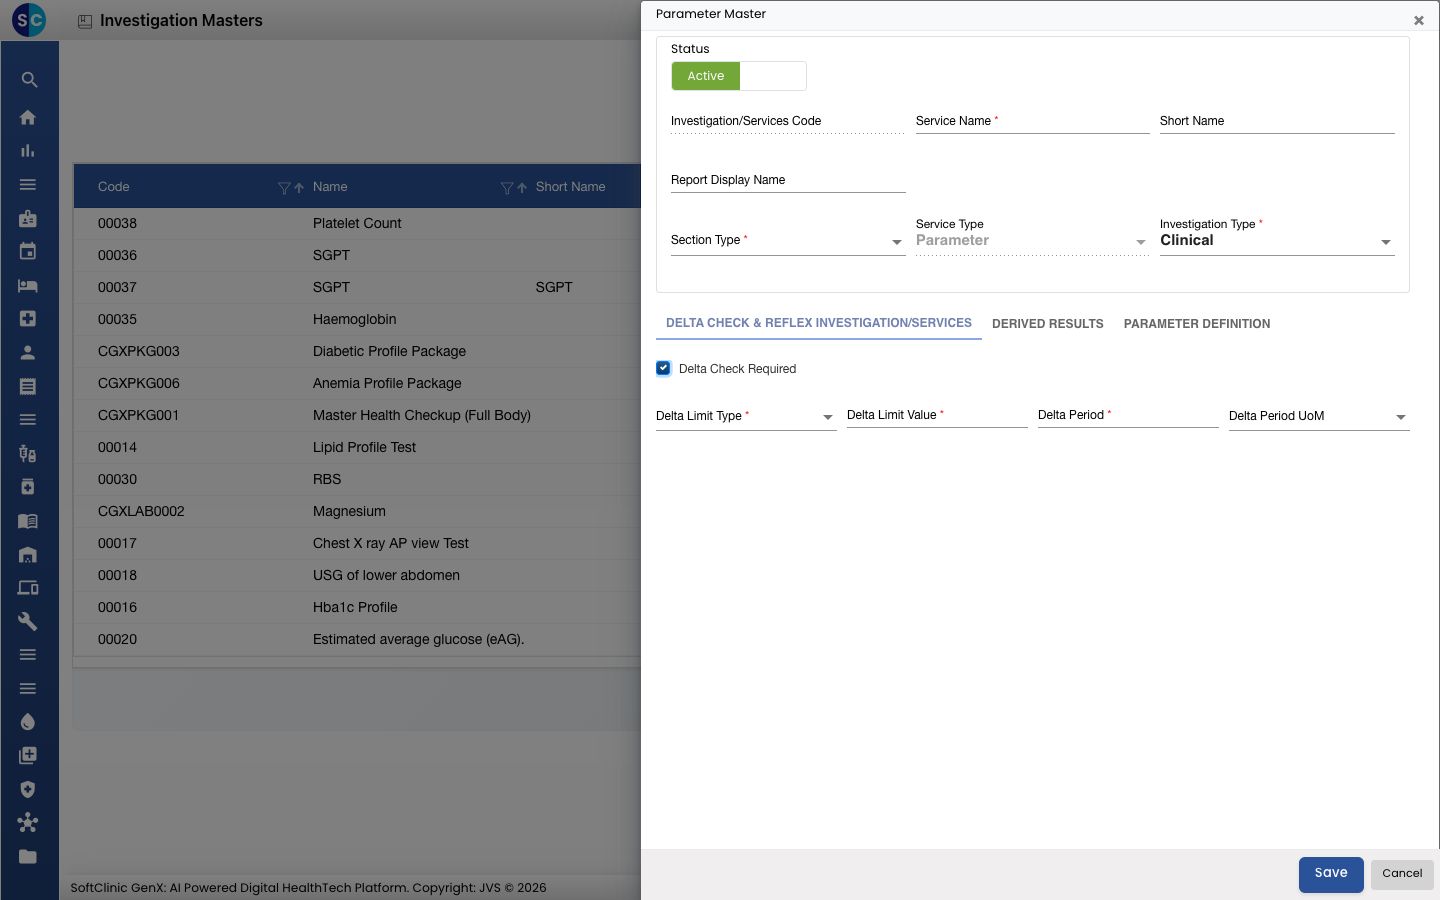
On a parameter's DELTA CHECK & REFLEX INVESTIGATION/SERVICES tab, tick Delta Check Required to flag a result that changes too much from the patient's previous result.
| Field | What to enter | Required |
|---|---|---|
| Delta Limit Type | Percentage or Amount. | Yes, when ticked |
| Delta Limit Value | The largest change allowed. | Yes, when ticked |
| Delta Period, Delta Period UoM | How far back to compare, for example 30 days. | Yes, when ticked |
Calculated results (formulas)
A numeric result can be calculated from other results, such as eAG from HbA1c. Open the parameter that is calculated and go to DERIVED RESULTS.
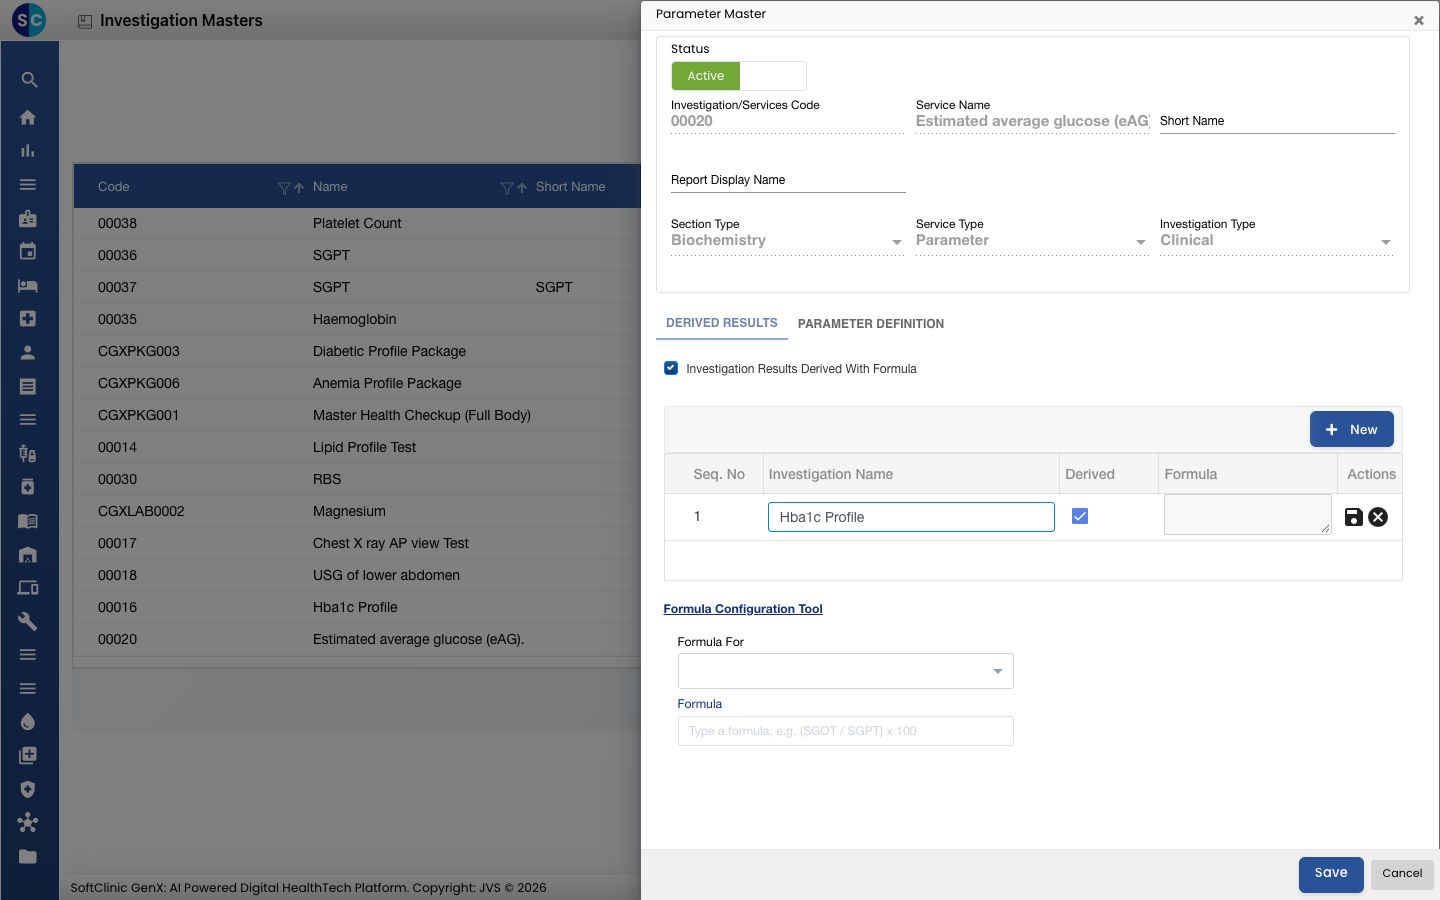
- Tick Investigation Results Derived With Formula.
- Click New, pick the test in Investigation Name, tick Derived and save the row.
- In the Formula Configuration Tool, choose the result in Formula For.
- Type the Formula, for example
(SGOT / SGPT) x 100. Use Insert Into Formula to add a parameter or an operator (+, -, x, /, brackets) at the cursor, and Clear to start again. - Click Save.
The formula is checked when you save. It is refused if the brackets do not balance, an operator is misplaced, a name is not a known parameter, or a parameter would be calculated from itself.
Change or deactivate a test or parameter
- In the list, click the ⋮ button at the end of the row and choose Edit.
- Change the fields or tabs you need. To stop offering the test, switch Status to Inactive.
- Click Save.
Tests and parameters cannot be deleted from this screen. Make them Inactive instead.
Good to know
- When the chosen service is a profile or package, the form shows a PROFILE CONFIGURATION tab instead, where you list the tests it contains.
- If a test with the same name already exists, the form offers Open existing so the test is not created twice.
- A new laboratory test needs at least one Sample Type, and a LOINC code or a reason why it has none.
- Changing the Result Type or Result Entry Mode of a test that already has ranges or parameters asks for confirmation, because the existing entries are removed.
- Click Cancel to close the form without saving.